Final Presentations

Leave a comment

On Friday, we invited some people to our course to present our projects. Here is a short description of each project. For detail explanation please goto the specific sites.

Coffee Timer

Verena Lerch and Frederik Brudy

In every office around the globe there is the same problem every day over and over again: People try working hard and every once in a while they need a break. So why not go for a coffee with their colleagues and catch up with the latest office information. So usually you open up your e-mail program, send a quick note and wait for reply from your co-workers. Soon, you will get about ten or fifteen replies from your colleagues, every single one with a different opinion about what the perfect timing would be. Often it really gets annoying and coffee-break-mails tend to be treated as spam messages. If one finally manages to find the perfect timing so everyone is happy soon you realize that at least one colleague has been left out of the mail and all the timing stuff starts all over again. Lots of precious working time is lost.This is where our CoffeeTimer kicks in: It is a fast and easy way to time your coffee break. CoffeeTimer saves time and stops the annoyance of finding the right timing to have a break and catch up in an unstressed atmosphere.

Read more.

Interactive Wardrobe

Anna Follmann | Beatrix Vad

In our project we developed an Interactive Wardrobe. Imagine an ordinary wardrobe, but with additional communication features and integrated enhanced light design. Users can record audio messages for currently absent people and the wardrobe plays the message as soon as the returning person hangs up his / her jacket. In addition the light design visualizes the current state of the wardrobe, e.g. left messages are indicated by colored lights.

Read more.

Spare Time Manager

Verena Hillgaertner and Bernhard Hering

Our project was the idea of designing a Spare Time Manager. It’s an new, interactive way to coordinate your leisure time with your friends. You only have to choose your three favorite spare time activities, the start and ending time which is best for you, also your friends you want to spend them with. Those friends will have to do the same, and after a short time, the Free Time Manager will calculate the time and activity, witch suits all friends best.

Read more.

The Interactive Doormat

Chadly Marouane
Johannes Preis

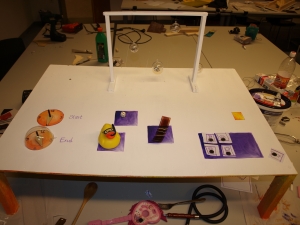
In our project, we present an ìinteractive doormatî. The main purpose of the mat is to enhance the experience when entering ones home. This is accomplished by letting the users enter a personal symbol combination on the mat with their feet while providing visual feedback on a back-illuminated display. Upon recognizing a user via the entered symbol combination, user specific feedback is provided (here: playing the users favorite song). In an alternative mode, the mat is used as a controller for a little memory game (similar to ìSimon Saysî).

Read more.

Lego Alarm Clock

Kyung-Jin Park
Lorenz Schauer

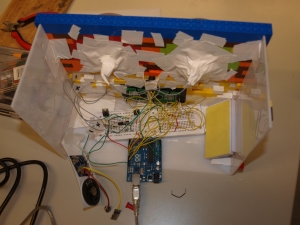
Our project we are going to present is an alarm clock with LEGO. When the alarm goes on one of the lights starts to blink and it shows on which color bricks you have to plug in the white LEGO bricks (you can find them on the right side). With the nose you can change the display (if it’s on or off). To switch-off the light, the sound and the spray (which has a awkward scent) you have to plug LEGO bricks on the right colors. If you do so the light, the spray and the sound goes off and a little hook on the left side gives you a sign that you’ve done right.

Read more.

Robocat

Robert Rödler
Maraike Stuffler

In our globalized world it has become very usual to have a long-distance relationship. Of course two people living far away from each other miss physical contact, or can’t even fall asleep without the other one. Indeed they are able to see each other via webcam, but they have no options to snuggle or hug, because personal computers aren’t very cuddly. They also could talk on the phone, but at the cost of their facial expression, which makes communication – in particular emotional communication – difficult. We worked out a solution for that missing part: “Robocat”, a soft toy, which you can take with you and snuggle with when you’re going to sleep, which can be used to communicate to the other person just by playing with it, and which shows you the mood of the other person. Robocat brings haptic and audible fun in long-distance relationships and banishs loneliness!

Read more.

We say thank you, to our supervisior Raphael and Alexander, for their help and ispiration.

The end is near

Leave a comment

Oh – what a productive day!

After the third day of our projects, there are just a few hours left to complete our works and to present the results to our lecturers and to other interested people. Therefore, all of us worked really hard and concentrated during that day and we can show you some interesting improvements of the prototypes we are developing.

Group A – Interactive Wardrobe:

Today, we connected almost the whole electronic, our board of buttons and two separates modules. Our problem for that moment is the communication between the two modules that is currently not working.

Group B – Interactive door mat

Today we reached out that all the LEDs are working well. We also wrote our Software for the communication with arduino and the mat. Our current problem is now, that our input method is not working correctly. The output works and the LEDs are blinking but our software doesn’t communicate with the mat.

Group C – Coffee Timer

Today we had our hardware final touch. But the big problem for that moment is, that Processing doesn’t work with our servos and we planed our project with processing. So it will cost us a lot of time to handle that circumstance.

Group D – Robocat

Today we wrote almost the whole software on Processing and we connected the majority of our hardware components. So our cat is already making noise. Our big Problem like in group D: Processing doesn’t support Servos and so we have to use arduino to handle this problem.

Group E – Alarm Clock with Lego

Even though in the morning didn’t work anything, we reached a lot today. We connected two servos to our arduino, created two ways to put the Lego on the alarm clock and fixed our other components to the Lego shell. We just have one problem left: The pieces of Lego don’t have a good connectivity, so sometimes the alarm doesn’t switch off when we have connected all the Lego pieces. But we’ll handle this tomorrow.

Group F – Freetime manager:

The table has a beep function and the lights are blinking and changing colors. But now the display is not working and we have some problems with our blue light. But we are confident to finish the table until tomorrow.

First Results

Leave a comment

After two days of developing we get first Results. Step by step each group built the outer hull and the inner electronic circuits.

We learned that it is important to test every small part of the electronic circuits, because you never now, if any transistor is broken, or the circuit doesn’t work as expected.

See a small video of a circuit with two multiplexer controlled by an Arduino, that can switch on and off all rgb channels of 3 light stripes.

After two days of developing you can see first results:


Status Day 5 Team A - Outside

Status Day 5 Team A - Breadboard

Status Day 5, Group B, Floor mat with cables?

Status Day 5 Team C, trying to fit the circuits into the plastic

Status Day 5 Team C, trying to fit the circuits into the plastic

Status Day 5 Team D - Cat

Status Day 5 Team D - electronic circuit

Status Day 5 Team E - Outside

Status Day 5 Team E - Inner Life

Status Day 5 Team F

Status Day 5 Team F, electronic circuit

Status Day 5 Team F, electronic circuit

Let the projects begin!

Leave a comment

In medias res – we started!

Since this morning we are actually working on our projects which each team has to complete until Friday, 1 pm.So each team is strongly motivated and very concentrated on their jobs and everyone has a special task which has to be completed after that day.

In the morning, we brought all the electronic stuff we could use to our lecture room, so our work environment looks like a little scrapyard.

Each team started immediately with its work and it seems like everyone has fun and a high interest to reach the personal goal.

Here are some impressions of the work of each team and our atmosphere in which we are progressing our idea of a new communication form.

Team 3 is working with their “ROBOCAT”

Not only electronic components are important, but also raw materials like wood.

The first steps of the new Coffee-meeting-machine

And this will be a new way to coordinate the free time activities.


Keyframes

Leave a comment

After lunchtime we had almost two hours to continue developing our idea of a project which can be found under the topic of “communication”. Each team continued working with one idea of the brainstorming phase. It was important to draw six sketches about one user scenario.


The Results:

Group A:

Anna Follmann, Beatrix Vad

Keyframes Group A

Group B:

Johannes Preis, Chadly Marouane

Keyframes Group B

Group C:

Verena Lerch, Frederick Brudy

Keyframes Group C

Group D:

Maraike Stuffler, Robert Rödler

Keyframes Group D

Group E:

Kyun-Jing Park, Lorenz Schauer

Keyframes Group E

Group F:

Verena Hillgärtner, Bernhard Hering

Keyframes Group F


Brainstorming

Leave a comment

Brainstorming, an Impression

The Results:

Group A:

Anna Follmann, Beatrix Vad

Brainstorming Results Group A

Interactive Wardrobe – Screaming Handbag – Enhancing Privacy (Phone / Door)

Group B:

Johannes Preis, Chadly Marouane

Brainstorming Results Group B

Group C:

Verena Lerch, Frederick Brudy

Brainstorming Results Group C

Coffee Brake – Interactive Mailbox – Interactive Music Wall with Ball Game

Group D:

Maraike Stuffler, Robert Rödler

Brainstorming Results Group D

Group E:

Kyun-Jing Park, Lorenz Schauer

Brainstorming Results Group E

Group F:

Verena Hillgärtner, Bernhard Hering

Brainstorming Results Group F

Day 3, Introduction

Leave a comment

The Agenda for day 3:

  • Presentation of Homework:
  • Theoretical background of brainstorming technics
  • Brainstorming
  • Presentation of Results
  • Lunch
  • Continue to develop the Ideas of the Brainstorming
  • Presentation of Results

In the morning, the students were asked to present their homeworks to the others. Each group had to find a Youtube Video which shows a good or funny arduino project. So all of us saw 6 videos about projects which already had been realized and which served us as a motivation to create our own projects during the next days. The presented videos are linked here:

Squeezebox

Tabletalk

Arduino + Lego NXT

Cheap Thermocam

Arduino und Gmail

Eyewriter

With that great motivation we were ready for the brainstorming phase. For that purpose, the lecturer gave us a short introduction about techniques of good brainstorming.

Each team (one team consists of two persons) had more than one hour to collect ideas for their project and to write them down on flipcharts. The topic of these projects is Communication. They have to be finished until friday, march 18th at one pm. For more information about that brainstorming phase, see our other post “Brainstorming”.

Before lunchtime, each team presented their charts and choosed one of the ideas to develop it more in the afternoon.

Circuit Diagram

Leave a comment

Day 2 starts with some circuit diagram exercises. Every task starts with a sketch of a circuit diagram and has to be translated to a real implementation on a bread board. The following diagrams were made with the fritzing software that can be found at http://fritzing.org

For the first implementation we use a red LED, a resistor, a button, a transistor and a power source. The transistor has three inlets: gate source and drain. The drain and source are connected to the first circuit that also contains the resistor and the LED, the gate inlet is connected to the button. If the button is pressed, the second circuit is closed and the gate inlet of the transistor gets a signal: the LED lights up.


With the previous setup the LED stays on as the electric charge can not drain. To avoid that the LED stays on after pressing the button we therefore have to add a pull-down-resistor from the button to the ground.

The second setup uses a IC timer, a LED, a resistor, two capacitors and a potentiometer (containing two variable resistors). The aim of the implementation is to let the LED blink in a frequency that can be regulated with the potentiometer. For the realization we use the LMC 555 SNC IC timer and description of the related datasheet (see “How to read a data sheet” post).


How to read a datasheet?

Leave a comment

When dealing with electrical components it is important to know their parameters as operating voltage, operating current and so on. Therefore the first step when using a new component, in our case an IC timer, is to look up the corresponding datasheet. Therefore you need to reed the code (numbers or letters) on the component and google it (in our example: “555 SNC datasheet”). Sometimes it is helpful to look also at datasheets from other providers as the datasheets vary and some may provide more details than others.

We used the following datasheet which can be found at http://www.datasheetcatalog.org/datasheet/stmicroelectronics/2182.pdf

IC Timer Datasheet

A datasheet contains all the information you need to use the component. It starts with a general description and the pin connections, a schematic circuit diagram of the component, absolute maximum ratings, operating conditions, electrical characteristics, and application information.

As we wanted to use the component for astable operations we only used the following diagram for the implementation of our application on the bread board:

IC Timer Snapshot Datasheet

Microcontroller and Arduino

Leave a comment

What can we say about microcontroller and arduino?

On the second day of our practical course we had a breve introduction about arduino and the language “processing”.

There are many programmable microcontrollers and different languages to program them. For our purpose we use “processing” because it offers many libraries for the arduino controller.

This controller costs about 25 euros. It is also open-source and offers a multi-platform environment which runs on several operating systems.

Our arduino comes with the Atmel AT Mega 328 chip and it is programmable via a USB port. For further information visit the arduino homepage: http://www.arduino.cc

To get used with the new software and hardware component, our first step in the course was to take a LED-light and to work with the blink example. We took a breadboard, a switch, a resistor and of course our arduino connected with the LED-light. The we wrote the blink example and yes: it worked very well!

The next topic was the “analog read”. We used a potentiometer to change the resistors and connected it to our breadboard. After changing our program, we were able to determine the frequency of the blinking.

Our last exercise with arduino on that day was to manage the “simple servo example”. We connected a servo motor to our breadboard and installed the simple servo example from arduino. With that construction, it was possible to control the servo by using the potentiometer.

To understand what we did and to read the information we got during this part of the course, take a look at the slides about microcontroller and arduino:

SWH Slides Part Three

Older Entries